Runner Game Block
Using this Block
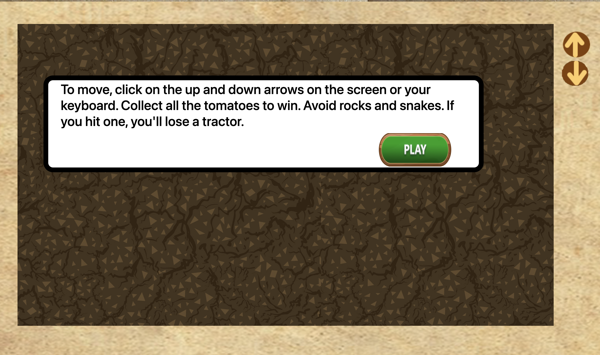
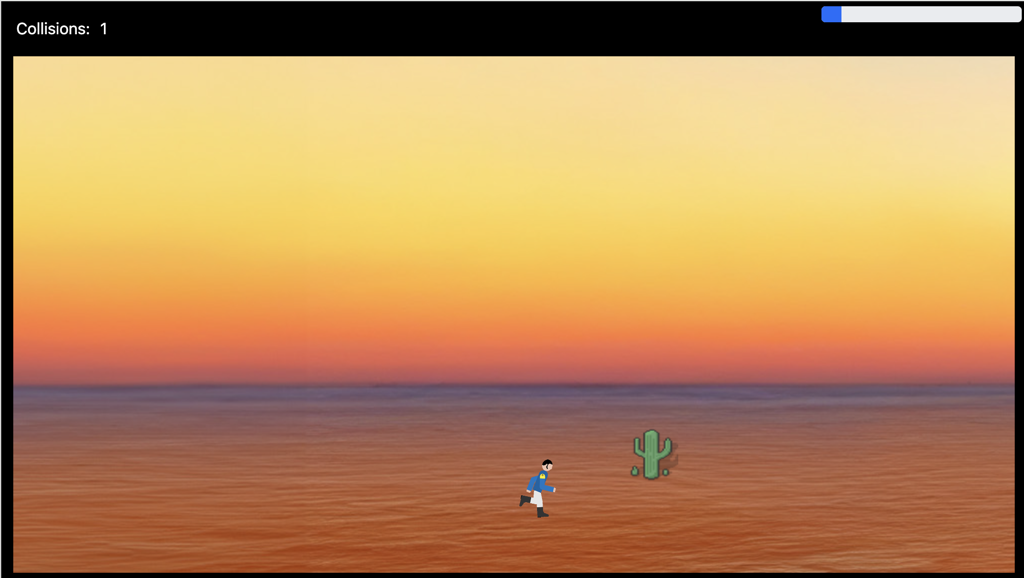
This is a game where the player runs from left to right, jumping over obstacles that appear in the way. Jump over a set number of obstacles to win the game. If you ever played the dinosaur jumping over cactus game on Chrome when the Internet was down, yeah, it’s like that.
Making it your own
What’s in the block
Like every block, the runner block has two files in the folder:
- An HTML file: runner.html . You should not have to change anything in this file.
- A config file: runner_config.js – This is where you will make any changes to create your unique game.
As with most blocks, it also has an images folder. Any images used specifically in this block will be saved here. This will include the game background, player character and the obstacles.
Ideally, the beginning and end of the image will match up, as in the example. Three backgrounds are included in the block. We will have more in the future.
NOTE: The default in the demo game is a height of 576px. In this game, you have a score box and progress bar at the top so the stage and image height are set at 516px. You could change those but then this screen won’t be the same size as the rest of the blocks in your game.
There is also an audio folder that has the sounds to play when you hit an obstacle.
The config file
In the runner_config.js file you’ll see two sections. As with all blocks, there is an options object. The options include instructions on how to play the game and where to go after you have won the game.
It looks as if there are a lot of options here, and there are, but there are only a few you need to change.
const options = {
    completionURL: "../next_block/next_block.html",
    stage: {
        width: 1000,
        height: 576
    },
    scrolling_image: {
        image_path: "images/runner_background.jpeg",
        width: "7680px",
        height: "600px"
    },
    end_of_animation: 3840, // as set in CSS
    ground_level: 200,
    runner: {
        image: "images/boy.gif",
        location: {
            top: "300px",
            left: "500px",
        },
        jump_height: "200px",
    },
    too_many_collisions_image: "images/runner_background.jpg",
    obstacle_interval: 700, // I don't see that this is used AM
    obstacle_stage_position: 1200, // position from left where new obstacle is inserted
    collision_rect_inset: 10, // inset obstacle rect to make it easier to jump over
    collision_counter_label: "Collisions:",
    collision_limit: 10, // Game restarts if collisions reach this limit
    obstacle_end_game_count: 20,
    intro_text: "Get to the end of the course while treading on as few snakes as possible. If you trod on ten you will have to start over. Use the space bar to jump.",
    too_many_collisions_text: "You stepped on ten snakes. You have to start over!",
    exit_text: "Great! You made it to the end without stepping on too many snakes! You get a pizza!",
    goal_image: {
        image: "images/pizza.png",
        height: "auto",
        width: "150px"
    },
    good_sound: "../../audio/win_game.mp3",
    bad_sound: "audio/hiss.mp3",
};
scrolling_image – give the path and filename for the background image.
ground_level – This is where, in pixels, your obstacles will be placed, counting the bottom of the game screen as zero. In the image below, this is where we are placing the snakes the character must jump over. I recommend just leaving it at 200, testing your game and then making the number smaller or larger, if necessary.

runner options
- image – enter the link for the image for the character you want to use as a runner
- location – the top and left values define the point in pixels that the game character is placed on the screen. I recommend just leaving it at as is, testing your game and then making the numbers smaller or larger, if necessary.
collision_counter_label – What do you want the label for the number of obstacles they fail to jump over?
collision_limit – How many obstacles can they run into before they lose? To make the game easier, increase this number. To make it harder, decrease the number.
obstacle_end_game_count – How many obstacles will be presented before the game ends? To make the game longer, increase this number. To make it shorter, decrease the number.
completionURL – link to go to after the game ends
intro_text – Instructions about the game. Be sure to include “Use the space bar to jump.”
too_many_collisions_text – Text to show when they lose the game.
What about all of those things you didn’t mention?
Like the obstacle_stage_position, collision_rect_insert etc.
You should leave those just as they are.
Obstacles
const obstacles = [
    {
        image: "images/snake.svg",
        height: "auto",
        width: "75px"
    },
    {
        image: "images/snake_cartoon.svg",
        height: "auto",
        width: "75px"
    }
];
You can have as many different obstacles as you want. We included several in the images folder, including a chicken. For each obstacle, include an image link and the width. If your image is not actually that width, it will be scaled down automatically, but it would make more sense to include an image of the size you want. The height will be computed automatically.
If you have more than one obstacle, one will be randomly select each time an obstacle is placed on the screen.
The config file should end with:
export {options, obstacles};