Menu Block
Using this Block
In a game where players choose their path, you may have a menu block with from two to six choices, where each choice leads to a different part of the game. In these games, we strongly recommend an introductory visual novel block that sets up the story before the menu page.
Making it your own
What’s in the block
Like every block, the menu block has two files in the folder:
- An HTML file: menu.html . You should not have to change anything in this file.
- A config file: menu_config.js – This is where you will make any changes to create your unique game.
As with most blocks, it also has an images folder. Any images used specifically in this block will be saved here.
The config file
In the menu_config.js file you’ll see two sections. As with all blocks, there is an options object. Unlike almost every other block the options here do NOT have a completionURL to go to when you finish with the block, because clicking on each of the menu items sends you to a different part of the game. There is no one path.
const options = {
    title: "Make a choice", // If this is present, a title is shown at the top of the screen.
    bkImage: "./images/menu_background.jpg", // Background image for title
};
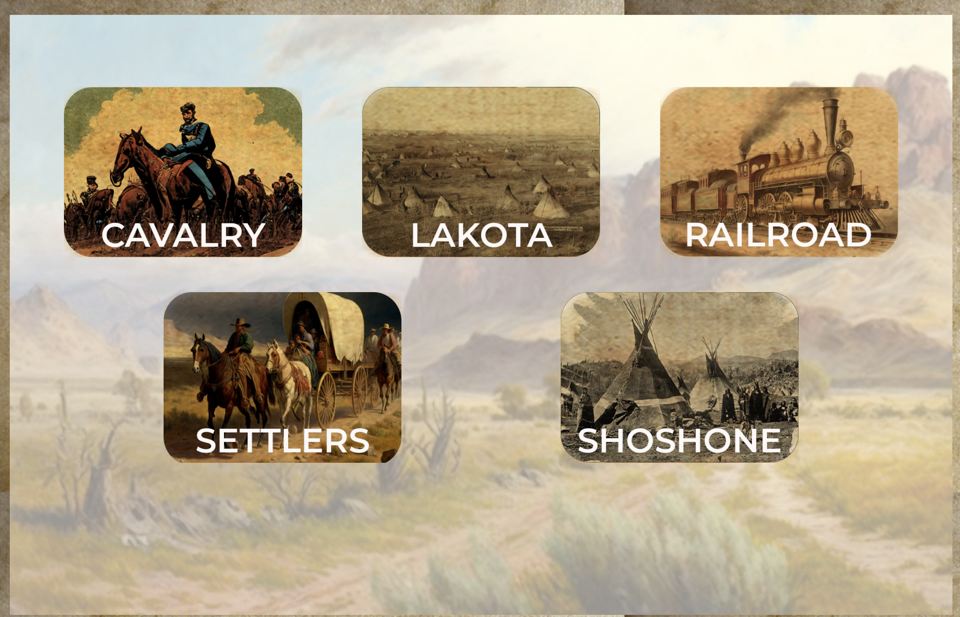
title : This is optional and you can see the example image above does not have a title. Enter just plain text. The title will be shown in large font, centered in the middle of the screen.
bkImage : This is the url for the background image for the menu.
The menu items
The menu can have up to two rows and each row can have up to three items. Thus, menus can have from two to six options. (A page with only one option to move on to another part of the game would be a level up page, not a menu. There is a different block for that. )
For each menu item, you’ll need text that will be read by a screen reader (the alt text value for an image) an image, and the url where you want the player to go in the game when they click on that menu item.
const menu_items = [
    // Row 1
    [
        {
           alt: "cavalry",
            imagePath: "images/cavalry_menu.png",
            url:  "../cavalry/gn.html"
        },
        {
            alt: "lakota",
            imagePath: "images/lakota_menu.png",
            url:  "../cavalry/gn.html"
        },
        {
            alt: "railroad",
            imagePath: "images/railroad_menu.png",
            url:  "../railroad/gn.html"
        },

    ],
    // Row 2
    [
        {
            alt: "settlers",
            imagePath: "images/settlers_menu.png",
            url:  "../cavalry/gn.html"
        },
        {
            alt: "shoshone",
            imagePath: "images/shoshone_menu.png",
            url:  "../cavalry/gn.html"
        }
    ] // End Row 2
];
alt : This is the word or words that will be read by screen reader software (alternative text), describing the image for this menu item. It will not show on the screen but can be useful for players with disabilities.
imagePath: location of the image for this box. For ideal results, we recommend images of 500 x 360 pixels.
url: Where clicking on this menu item will take the player.
Design Tips
- If you only want three options, delete everything from the line with Row 2, to the End Row 2 line.
- If you want four boxes, we recommend deleting the third box from the first row. A layout of 2 x 2 looks better than 3 and 1.
- The images above have short titles describing where this choice leads. Whether you include words or not on the image is optional. We’ve done it both ways but many teachers prefer labeled items over images alone.