Visual Novel Plus
- Using this Block – Overview
- Making it your own
- The config file
- Item Placement
- Options
- Screens
- Position Images – add, move and remove images on screen
- Adding Choice Buttons
- FAQs
- Trouble-shooting
Using this Block – Overview
The Visual Novel Plus block is used to present a series of images and text. Each time the “next” button is pressed, the next text in the sequence is presented, potentially with a new image. Each step containing text and an image is called a “screen.”
There are two less advanced visual novel blocks, Visual Novel Bilingual, for those who want to create a game in multiple languages, and Visual Novel, an easy to use block for those who need only images and caption, in a single language.
The Visual Novel Plus has a lot of optional capabilities, including everything the basic and bilingual versions, plus more. Anyone can use it, but if you have a very little knowledge of Javascript arrays, objects and properties, it will be easier to use and you’re less likely to end up with bugs in your code.

The PLUS in Visual Novel Plus
Optional features include:
- The ability to add, move or remove characters and items on the screen.
- Choice buttons – A decision choice can be shown on the screen to take a player to a different part of the game (think Choose-Your-Own Adventure, but these choices can be also used to check for understanding and send a player for re-teaching or a different example).
- Present text and audio in two different languages. Alternate text is specified for each screen and the player switches languages by pressing a button.
- Voiceover audio for each screen, reading the text content. The audio can be played automatically or it can be played when the player presses a button. This feature is available in all of the visual novel blocks.
- A title page, with a title superimposed on the image on the first screen.
Making it your own
What’s in the block
Like every block, the Visual Novel plus block has two files in the folder:
- An HTML file: vn_plus.html . You should not have to change anything in this file.
- A config file: vn_config_plus.js – This is where you will make any changes to create your unique game.
As with most blocks, it also has an images folder. Any images used specifically in this block will be saved here.
There is also an audio folder. Any audio files (voiceovers) in the block will be saved here.
The config file
In the vn_config_plus.js file you’ll see three sections. As with all blocks, there is an options object. The options include instructions on how to play the game and where to go after you have won the game.
Item Placement
If the background image size is 1920 x 1080, you don’t need to change anything in the item_placement_config object.
The first section of the config file is for placement of items and is used in resizing all of the items on the screen to the same scale. If players are using a smaller screen size, like a phone or tablet, everything will re-size automatically.
We recommend 1920 by 1080 as a good size for background images, especially for the web, and we have found students are most often using educational games on a Chromebook, but if you want it to be a different size, you can change it.
const item_placement_config = {
   originalBackgroundSize: {width: 1920, height: 1080}, // size of background image
    backgroundDivID: "main",  //ID of div containing background image. DON'T CHANGE THIS;
   itemDivClass: "images", // DON'T CHANGE THIS;
   displayItems: [] // DON'T CHANGE THIS;
};
Why include properties you shouldn’t change?
You might wonder why we have a few properties that we tell you not to change. We expect that 99.9% of users will never need to change these values. Why include them in the file then? For the same reason that WordPress will let you change the code in a them, even though it stresses you should really know what you are doing. We expect this block is used by developers with more experience than users of most of the other blocks. It may be that you are including this block within the context of a larger game and you already have something with an ID of “main” or a class of “images”. In general, we’d still recommend that you don’t change these IDs or classes and make those changes in the other part of your code instead.
Options
As with all blocks, there is an options object. The options include whether to have a title page, whether to play voiceovers and where to go after you have won the game.
const options = {
   autoPlayAudioOnNewScreen: true,
   completionURL: "../next/next_block.html", // URL to proceed to after the last screen
   title: "My visual novel", // If this is present, a title page is show with this text.
    titleImage: "images/screen2.jpg", // Background image for title
    title2: "Mi novela visual", // Title in the second language
    language1: "English", // Language for language 1
    language2: "Spanish" // Language for language 2

};
The options object controls options for the whole block.
- autoPlayAudioOnNewScreen – set this value to true if you want the audio to play automatically for each screen. Set it to false if you have no audio or if you don’t want audio to play automatically. If this value is set to false and there is audio included for a screen, the speaker button will be displayed in the top left corner of the screen.
- completionURL – the URL where you want to go at the end of this visual novel block. NOTE: If you use the decision buttons in your visual novel (see below), the player will go wherever directed by that choice and the completionURL will not be used.
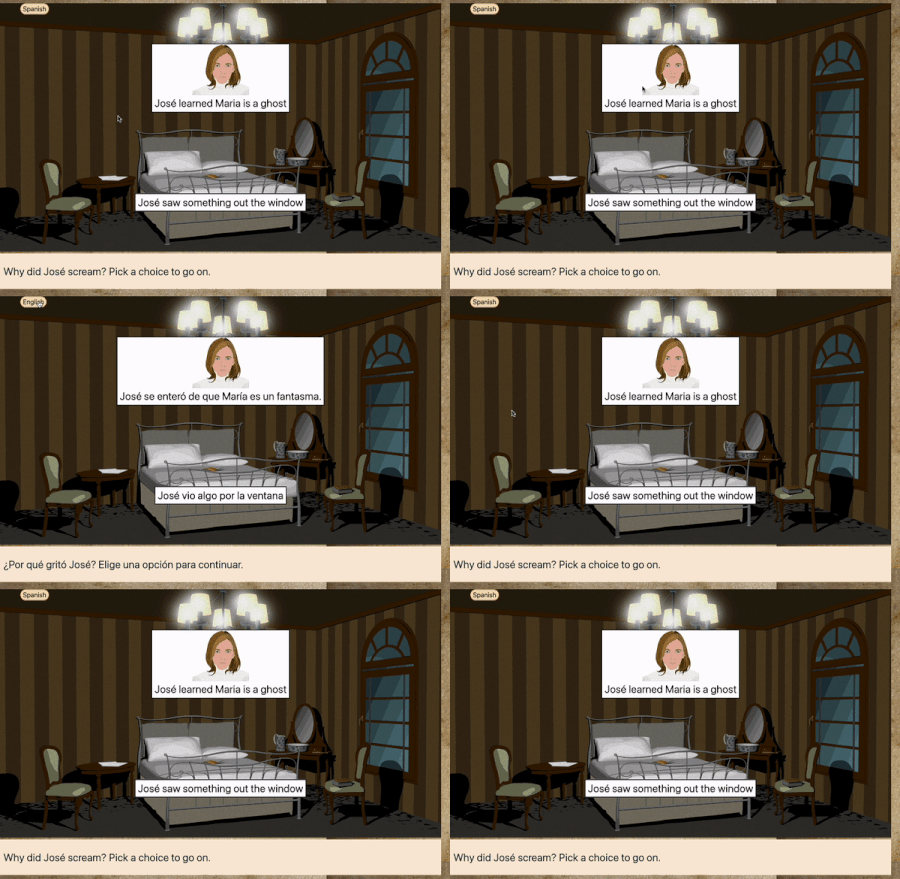
- title – If you want a title page, enter a title for your visual novel block here. You can see a title page example above. If you don’t want a title, delete this whole line and your visual novel will just start with the first page. Because browsers block autoplay of audio, if you want the text to be automatically read to players, we recommend a title page.
- titleImage – If you have a title, enter the url for the background image you want for that title page. If you don’t have a title page, you can just leave it as it will not be used. Or, delete it if that makes you happy.
- title2 – If you have a title, include the title text in the second language here.
- language1 – Text to show on the language button to switch back to the first language. (See image above.) Usually, the first language will be English.
- language2 – Text to show on the language button to switch to the second language. (See image above.)
NOTE: Delete the last three lines if your game is not bilingual.
Screens
The screens object creates each screen of the visual novel. An example screen is shown below.
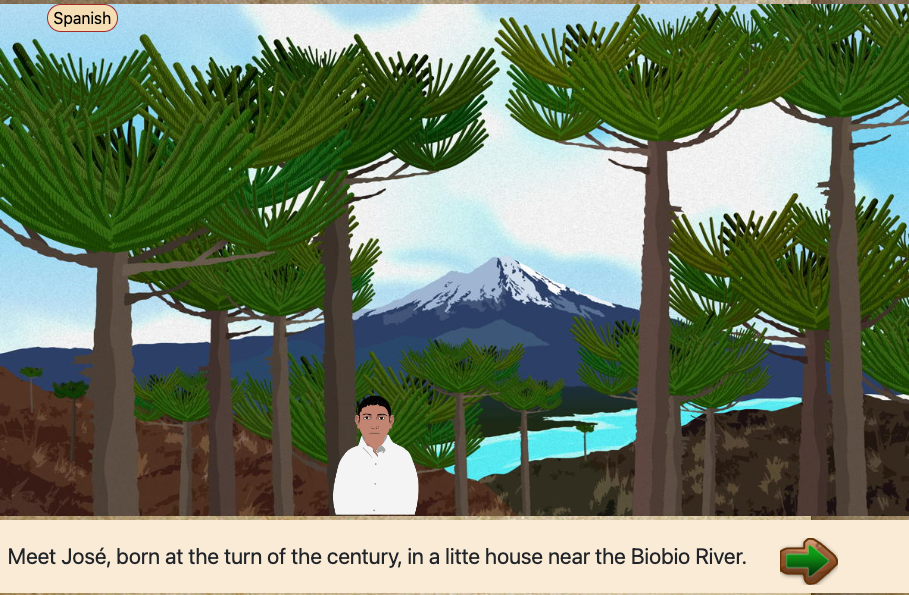
The block comes with four screens with text, images, audio and choices. You can copy and paste the code for as many screens as you like. Just be sure to include a comma between each screen, as shown below. Audio is optional.
const screens = [
// SCREEN 1
 txt1: "Meet José, born at the turn of the century, in a litte house near the Biobio River.",
    txt2: "Conoce a José, nacido en el cambio de siglo, en una pequeña casa cerca de del río del Biobío.",
    audio1: "audio/scr1_eng.m4a",
    audio2: "audio/scr1_sp.mp3",
    bg_img: "images/screen1.jpg",
    images: [ //make array for the option of multiple images
        {
            id: "boy",
            path: "images/jose_half.png",
            location: {
                top: "820",
                left: "700"
            },
            scaling: 0.1,
            layer: "2",
        }
    ]
NOTE: While you may think txt1 is for the first screen and txt2 for the second, that’s NOT how it works. On every screen, txt1 is the text for language 1 and txt 2 is the text for the second language. If your game is only in one language, you can delete the txt2 line. Each screen should have no more than two lines of text.
- txt1: The text shown on this screen in the first language – This should be no more than 2 lines of text.
- txt2: The text shown on this screen in the second language – This should be no more than 2 lines of text.
- audio1: Link to the audio for this screen. If you have no audio, you can delete this line or just leave it as is.
- audio1: Link to the audio for this screen. If you have no audio, you can delete this line or just leave it as is.
- audio2: Link to the audio for this screen for the second language. If you have no audio, you can delete this line or just leave it as is.
- bg_img: Link to the image file for this screen.
- images: Add images over the background layer. These can be characters or any other image.
Positioning images on a screen
- id: Each image needs a unique ID when it is first placed on the screen. You’ll use this ID to move or remove it.
- path: where the image to be loaded is located. In some games, this may be in a top level images folder, in a characters subdirectory. In the example above, it is in the images folder for this block.
- location: This is the initial top and left position of the image on the page, in pixels. This is set relative to the scale you gave in the item_placement_config object at the top of this file.
- scaling: This is the initial scale of the image relative to its actual size. So, if I have an image that is 900px in width, it’s going to be scaled to 90 pixels initially.
- layer: This is the z-index and should be at least 2 and less than 99. As with any z-index, images with a higher value will be on top of those with a lower value.
Only one image is shown here but you can add multiple. To create multiple images, simply add a comma and then copy and paste for a new image. Remember, this is an array, so the images need to be between the [ brackets ] as shown above.
Removing an image
Images stay on the screen until removed. To remove an image, simply include this line
remove_img_id: "id_to_remove" If this is NOT the last property specified for tihs screen, it needs to be followed by a comma. Also, note that this is NOT part of the images array so that it should be before or after the [brackets ] for the images and not inside those.
If you would like to remove more than one image, simply put the list of ids in an array, as shown below.
remove_img_id: ["boy3","girl"] {
txt1: "His parents expected him to die there too, and for a while, he thought the same thing...",
txt2: "Sus padres esperaban que él muriera allí también, y por un tiempo, pensó lo mismo...",
audio1: "audio/scr2_eng.m4a",
audio2: "audio/scr2_sp.m4a",
bg_img: "images/screen0.jpg",
images: [ //make array for the option of multiple images
{
id: "boy2",
path: "images/jose.png",
location: {
top: "540",
left: "1200"
},
scaling: 0.1,
layer: "2"
}
],
remove_img_id: "boy"
},Moving an image
Use the SAME id value as when you added the image to the array and give the new top and left positions in pixels.
    // SCREEN 3
    {
        txt1: "But it didn't turn out that way.",
        txt2: "Pero no resultó de esa manera.",
        bg_img: "images/screen4.jpg",
        audio1: "audio/scr2_eng.m4a",
        audio2: "audio/scr2_sp.m4a",
        images: [ //make array for the option of multiple images
            {
                id: "girl",
                path: "images/maria.png",
                location: {
                    top: "600",
                    left: "900"
                },
                scaling: 0.1,
                layer: "2"
            }
        ],
        move_img: {
            id: "boy2",
            top: "560",
            left: "1200"
        }
    },
Adding Choice Buttons
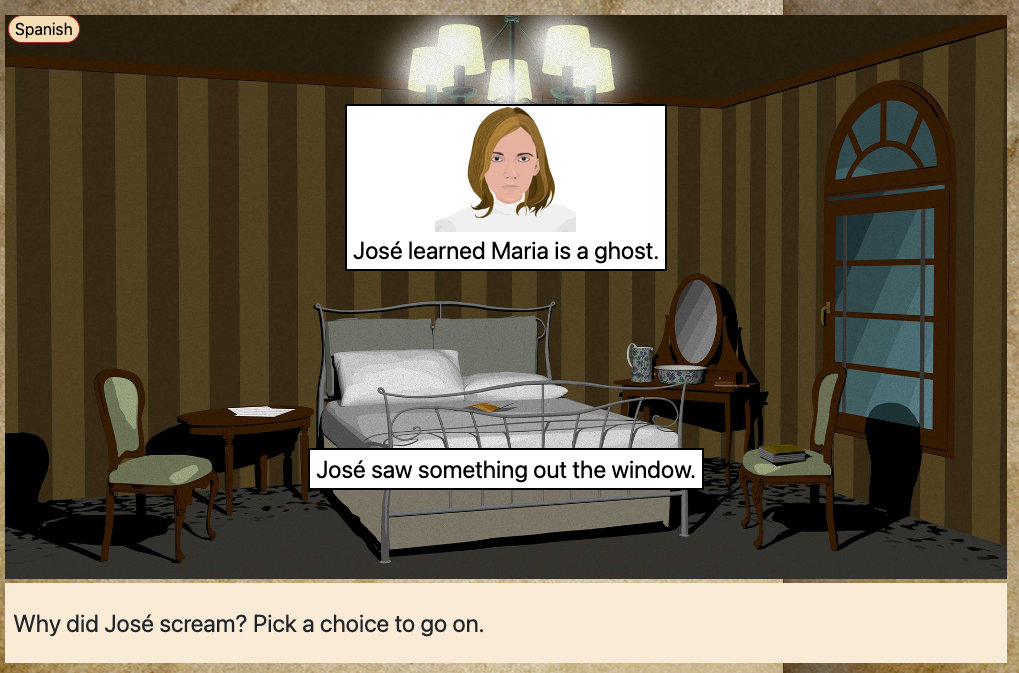
The Visual Novel Plus block includes the following code for decision buttons. You’ll probably want either both choices to have an image, or neither, but we’ve shown one button each way in the example below, just for demo purposes. There is not a set maximum number of buttons but for readability we recommend no more than three if using images and no more than four without images.
Choices are an array assigned to the decision property.
- There is an optional screen property named decision. This is an array of objects, so all choice objects go between the square brackets [] , which is preceded by decision: as shown below.
- Since each choice is an object, all object properties go between the curly brackets {} . As these are array elements, each choice object except for the last one is followed by a comma, as shown below.
- Each choice can have a title, an image or both. You need a button title OR button image, otherwise, the button will not be shown.
- Note that all of the object properties are CASE-SENSITIVE , so, for example, if decisionURL, is written as decisionUrl, since there is nothing by that name in the blocks base code, when you click on the choice, you will go nowhere.
- choiceID – Each choice requires a choiceID which must be unique for this screen. You can use the same choiceID again on a different screen if you’d like.
- buttonTitle (optional) – Text for the button in first language.
- buttonTitle2 (optional) – Text for the button in second language. If not a bilingual game, don’t include this line.
- buttonImage (optional) – this is the path to the source file for the image for this choice.
- decisionURL – where to go when the user picks this choice.
    // SCREEN 4
{
        txt1: "Why did José scream? Pick a choice to go on.",
        txt2: "¿Por qué gritó José? Elige una opción para continuar.",
        audio1: "audio/scr5_eng.mp3",
        audio2: "audio/scr5_sp.mp3",
        decision: [
            {
                // Decision button 1
                choiceID: "maria_ghost",
                 buttonTitle: "José learned Maria is a ghost.",
                buttonTitle2: "José se enteró de que María es un fantasma.",
                buttonImage: "images/maria_head.png",
                decisionURL: "../next_block/next_block.html"
            },
            {
                // Decision button 2
                choiceID: "go_on",
                buttonTitle: "José saw something out the window.",
                buttonTitle2: "José vio algo por la ventana.",
                decisionURL: "../next_block/next_block.html"
            }
        ]
}
FAQs
Q. Can I have multiple visual novel blocks per game?
A. Absolutely! You can have as many as you like. Just copy the visual_novel directory in your game and paste it into the blocks directory with a new name.
Q. Can I have multiple choice screens in one visual novel?
A. No, because the choices send the user to another block. What you can do, though is have one or both of the choices go to continuation of the story in a different visual novel block.
Q. What if I have the same image for several screens, and just the text underneath is changing, do I need to paste that background image link every time?
A. No. If the image is the same as for the previous screen, you don’t need to repeat it, you can delete the bg_image line and continue as below. You only need a bg_img link when the image is changing. If you do repeat it, your game will work fine, it’s not an error, just unnecessary.
{
  txt1: "the second screen",
  audio1: "audio/scr2_eng.m4a"
},
Q. Can I have a voiceover on some pages and a sound effect, like waves, on other pages?
A. Yes. Whatever is in the audio file for that screen will play. .
Trouble-shooting
I don’t see an image or caption, just an arrow.
Do you see this in your Javascript console?
Uncaught SyntaxError: Unexpected token ‘{‘
Are you missing a comma between screens? Each screen ends with a } and then a , before the next screen as shown below.
{
  txt1: "the second screen",
  audio1: "audio/scr2_eng.m4a"
},
My image is not showing up on the background
Do you see this in your Javascript console?
Uncaught TypeError: currentScreen.images is not iterable
Did you forget to enclose the image specifications in square brackets?
    images: //make array for the option of multiple images
     [{
         id: "boy",
         path: "images/jose_half.png",
         location: {
             top: "685",
             left: "700"
         },
         scaling: .15,
         layer: "2",
     }
     ]
I had two images in my code but only one shows on the screen
Did you use the same id for both? If your code looks something like this, only the first image will be shown.
    images: //make array for the option of multiple images
     [{
         id: "boy1",
         path: "../../images/characters/jayden_left.png",
         location: {
             top: "120",
             left: "750"
         },
         scaling: .13,
         layer: "2",
     }, // NOTE THIS IS AN ERROR BECAUSE IT USES THE SAME ID
         {
             id: "boy1",
             path: "../../images/characters/kai_pose2.png",
             location: {
                 top: "170",
                 left: "450"
             },
             scaling: .12,
             layer: "2",
         },
     ]
I changed the location of the image and it disappeared
Did you use the move_img method? To move an image you do NOT use the same ID and change the location in the images array. You use the move_img method. If you have an image with the id of “girl” and you want this image moved on the next screen to 170 pixels from the top and 150 pixels to the left, on the NEXT screen, then one where you want that location, use the same id, “girl” and the new position. NOTE: You need to include both the top and left position, even if one of these is the same as the previous screen.
move_img: {
            id: "girl",
            top: "170",
            left: "150"
        }
My images aren’t scaling
Whether the problem is that none of your images are scaling or just some of them are not, it’s possible that you included the scaling inside the location method as shown below. Both scaling and layer should be OUTSIDE of the curly brackets that define location.
  images: //make array for the option of multiple images
            [ {
                id: "dad",
                path: "../../images/characters/dad_back.png",
                location: {
                    top: "150",
                    left: "250",
                    scaling: .24, WRONG! IT SHOULD NOT BE HERE
                    layer: "2",   NOT THIS EITHER
                }
            }
            ]
Instead, both scaling and layer should be OUTSIDE of the brackets defining location, like the example below.
images: //make array for the option of multiple images
            [ {
                id: "dad",
                path: "../../images/characters/dad_back.png",
                location: {
                    top: "150",
                    left: "250",
                },
                scaling: .24,
                layer: "2",
            },
          ]
2 Comments